Welcome To ASBWorks! To get started follow these simple instructions
Before using ASBWorks we must:
•Gather basic information such as the organization name and address
•Establish the opening date and reporting periods for your accounting books
•Provide the current balances for your Chart of Accounts
Note: It is not possible to repeat this process once completed so it is critical that you enter all information completely and accurately. You may cancel at any time but the information that you have entered will be lost
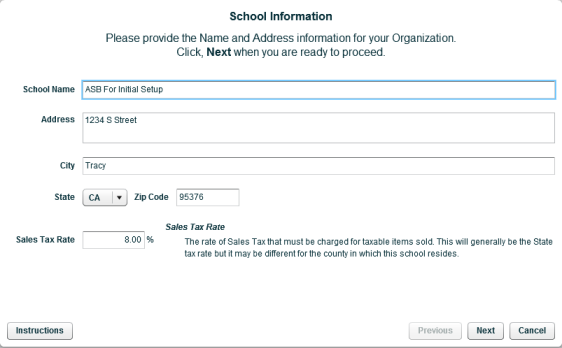
School Information:
In this section you will:
1.Enter in the school name
2.Enter in the address of the school
3.Input a sales tax rate
Opening Your Books:
Your accounting books will be maintained for Fiscal Year and Tax Year reporting periods
•Fiscal year is the period over which you manage your organizations finances
•Tax year is the period over which you report your organizations taxes
Generally the tax year is the same as the Fiscal year, however, if your organization reports its taxes over a different period, relevant reports will be available for both the fiscal and tax year
The Opening Date is the date you must start entering all of your transactions. Note: You will not be able to enter transactions prior to this date
If the Opening Date is not the start of the Fiscal Year, you will be required to provide a Balance Forward from the Prior Fiscal Year. A Balance Forward from the Prior Tax Year will also be required if the Tax Year differs from the Fiscal Year
.png)
Bank Accounts:
On this page, you must provide the information for all your Checking and Savings Accounts. At least one checking account is required. For each account, you will need:
•The latest bank statement prior to the Opening Date, and
•Any outstanding checks and deposits as of the Opening Date
When you add a bank account, you will be asked to provide:
•The Account Number and Account Name, and
•The Last Statement Date and Statement Balance, and
•Any outstanding Checks and Deposits
If this is your first visit to this page, you must provide the information for the primary checking account. Note: You may not proceed to the next page until you have finished setting up the primary checking account
On this screen you must:
1.Select either "Checking" or "Savings"
2.Enter in an account number and name - tip: make sure your primary account for checks/deposits is entered alphabetically first - that way it will become your default account going forward.
3.Select the last statement date
4.Select your statement balance
5.Add any outstanding checks or deposits to the account
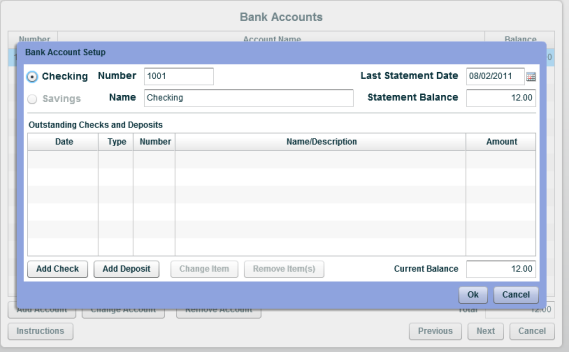

Note: You can add, change (not recommended), or remove accounts by selecting the desired action on the bottom of the screen
Asset Accounts:
Assets are anything of value that can be turned into cash. Land, Furniture, Stocks, Inventory, and Accounts Receivable are all considered Assets.
Use this page to add any additional Asset accounts. You may tab through the list below to change the account Numbers, Names, and Current Balances
Add New Asset Accounts by:
1.Selecting "Add Account"
2.Entering in an account number
3.Entering in an account name and account description
4.Selecting an account type

.png)
Note: You can add, change, or remove accounts by selecting the desired action on the bottom of the screen
Liability Accounts:
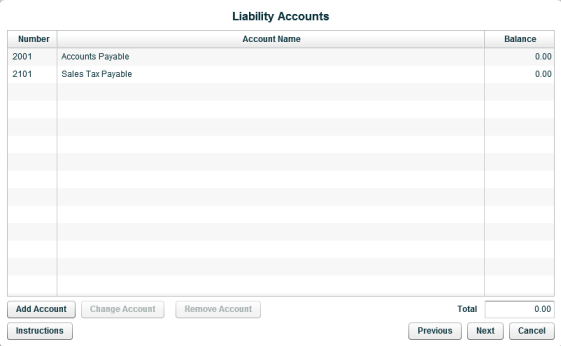
Liabilities are anything representing money owed to others. Accounts Payable, Loans Payable, and Sales Tax Payable are all considered Liabilities.
Use this page to add any additional Liability accounts. You may tab through the list below to change the account Numbers, Names, and Current Balances
Add New Liability Accounts by:
1.Selecting "Add Account"
2.Entering in an account number
3.Entering in an account name and account description
4.Selecting an account type
.png)
Note: You can add, change, or remove accounts by selecting the desired action on the bottom of the screen
Income Accounts:
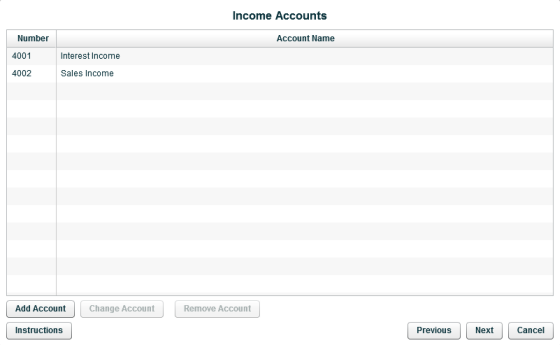
This is a list of your Income Accounts. You may tab through this list to change account Numbers and Names and you may also Add new accounts.
Additional Income Accounts can be added later at any time following completion of this setup process.
If any of these accounts has a Current Balance, you may not enter it here. If there is a Change in Fund Balance, you will be required to provide balances for these accounts in a later page
Add New Income Accounts by:
1.Selecting "Add Account"
2.Entering in an account number
3.Entering in an account name and account description
4.Selecting an account type
.png)
Note: You can add, change, or remove accounts by selecting the desired action on the bottom of the screen
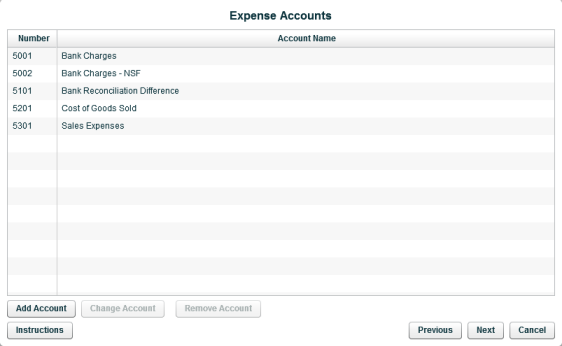
Expense Accounts:
This is a list of your Expense Accounts. You may tab through this list to change account Numbers and Names and you may also Add new accounts.
Additional Expense Accounts can be added later at any time following completion of this setup process.
If any of these accounts has a Current Balance, you may not enter it here. If there is a Change in Fund Balance, you will be required to provide balances for these accounts in a later page
Add New Expense Accounts by:
1.Selecting "Add Account"
2.Entering in an account number
3.Entering in an account name and account description
4.Selecting an account type
.png)
Note: You can add, change, or remove accounts by selecting the desired action on the bottom of the screen
Congratulations!
You have successfully provided all the information necessary to begin using ASBWorks!
This page contains a list of the accounts with non-zero balances as well as your calculated Fund Balance and Change In Fund Balance, if any.
Please review this information for accuracy. You may return to any of the previous pages to correct any mistakes.
Once you are certain all the information is correct, click the Finish button to complete the setup process.
You may not restart this process once it has been completed.

Select "Finish" to complete the initial setup process
Copyright © 2010-2019 ASBWorks™